To start configuring the Channable connector, you first need to understand how the components are structured in Channable. The following image shows the hierarchy of elements:
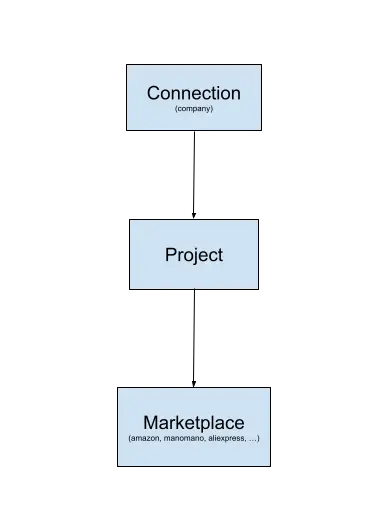
Brief explanation of the previous image: A "Connection" is equivalent to the company; for each company, different projects called "Project" can be created. In each project, you can import and manage your product data in Channable, and for each project, you can assign as many markets as you need.
You can access the FAQ section directly here.
First steps
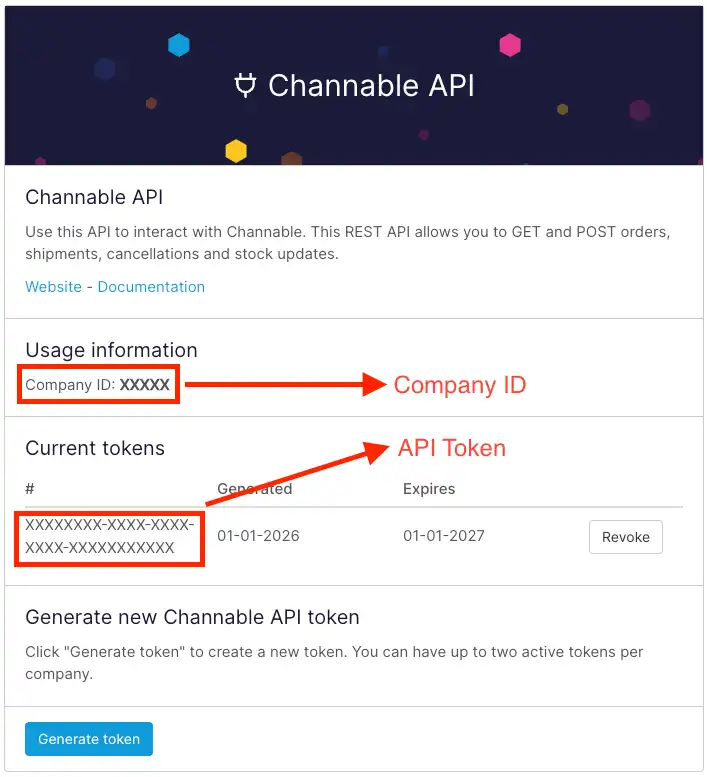
To start synchronizing orders, you first need to activate your company's API in your Channable account. Follow the steps below
to generate the Channable API for your accountin this step, you need to have the following values saved, the Company ID and the API Token:
Set up a connection
In your Odoo, go to the Sales module, then to the Configuration section ‣ Channable Connector - Connections, click on the New button at the top left. In this form, you define the connection with the following mandatory fields using the data obtained previously here:
- Name: Name of your company.
- API Token: Identifier or token of the API.
- Company ID: Identifier number of the company.
Only one connection can be configured with the same Company ID and API Token.
Set up a project
In your Odoo, go to the Sales module, then to the Configuration section ‣ Channable Connector - Projects, click on the New button at the top left. Here you define the project, with the following mandatory fields:
- Project name.
- Identifier: you can obtain this number in Channable by entering the project you are configuring and copying the identifier, as shown in the following image, click on copy and enter it in this field in Odoo:

- Connection: Connection or company associated with this project, if you do not have any connection configured, you can create one here .
Set up a marketplace
In your Odoo, go to the Sales module, then to the Configuration section ‣ Channable Connector - Marketplaces, click on the New button at the top left. Here you define the marketplace from which you want to import its orders to your Odoo, with the following mandatory fields:
- Name: Name of the marketplace from where the orders will be imported, for example: Amazon, eBay, AliExpress, ManoMano Fulfillment, etc.
- Order configuration ID: Market identifier in Channable, first access the project where the connection belongs and follow these steps:
- Project ‣ Setup ‣ Orders ‣ Click on the Settings button of the market you are configuring:
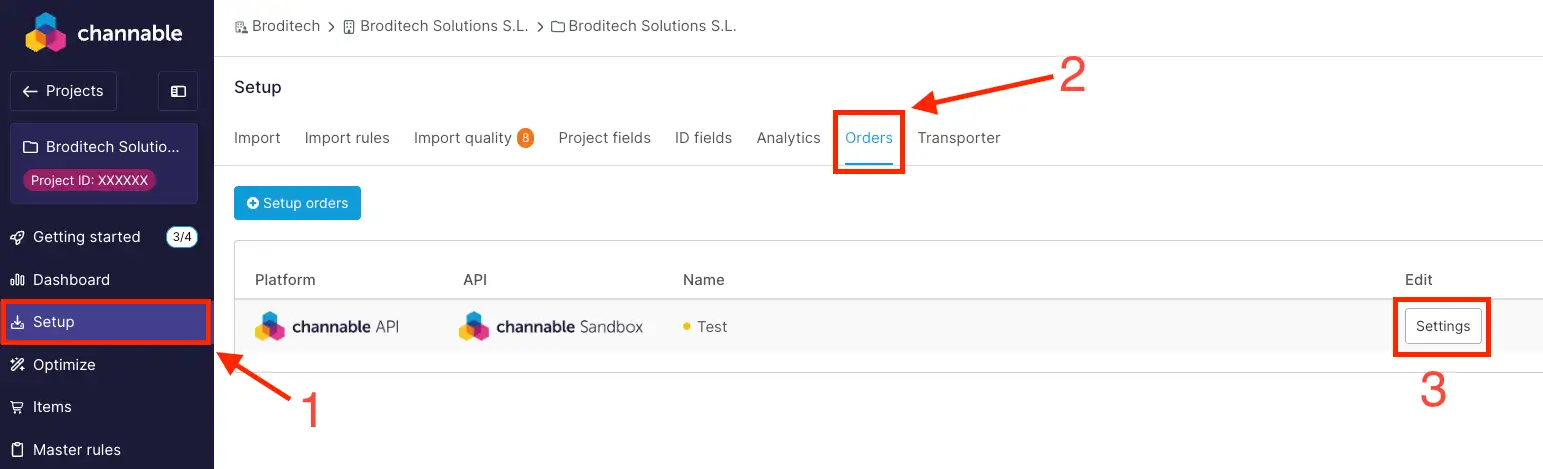
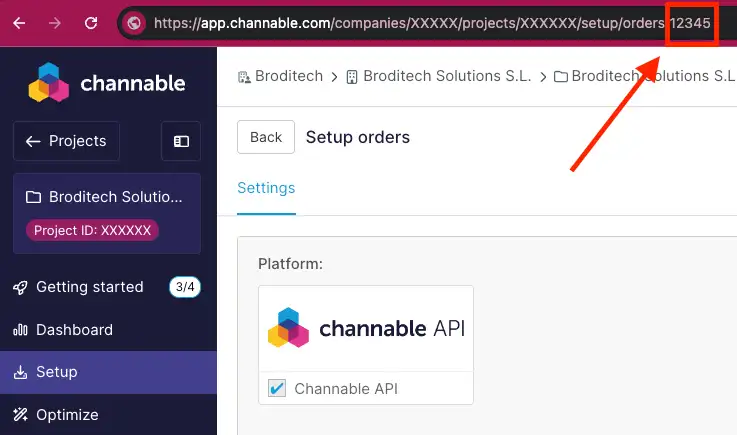
- In the URL, copy the last number and paste it into Odoo:
- Project ‣ Setup ‣ Orders ‣ Click on the Settings button of the market you are configuring:
- Project: Project to which this marketplace is assigned, if you do not have any configured project, you can create one here .
- Assign errors to this user: User to whom errors will be assigned when trying to synchronize orders from this marketplace with Channable.
- Warehouse: The warehouse from where the stock for the orders of this market will be picked up.
- Default operator: Default shipping method that will be assigned to orders from this market. To make it a valid shipping method, configure one by clicking here .
- Pricelist: Price list that will apply to orders.
- Payment provider: Provider that will be used to create the payments.
- Payment method (v17.0 and above): Payment method according to the selected provider.
You can view all the fields in detail by clicking here.
There can only be one market with the same identifier and name.
Set up transporter
In your Odoo, go to the Sales module, then to the Configuration section ‣ Shipping methods, select a shipping method and go to the tab called Channable. In this section, there is a field called transporter, this is the carrier that will be used when the delivery note of the order is sent and to notify Channable that the order has been shipped. To create a carrier, follow these steps:
- Click on the following link here once inside, expand the list of carriers by clicking as shown in the following image:
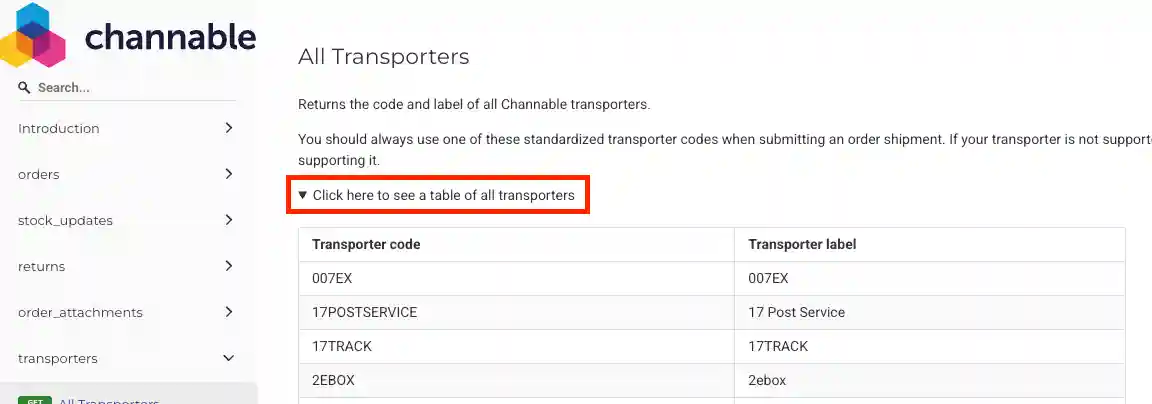
- Look for the carrier you want to integrate into Odoo, the first column shows the code and the second column shows the name of the carrier. Copy the name from the first column that corresponds to the code.
- In Odoo, paste the carrier code and the name, as shown in the following image:
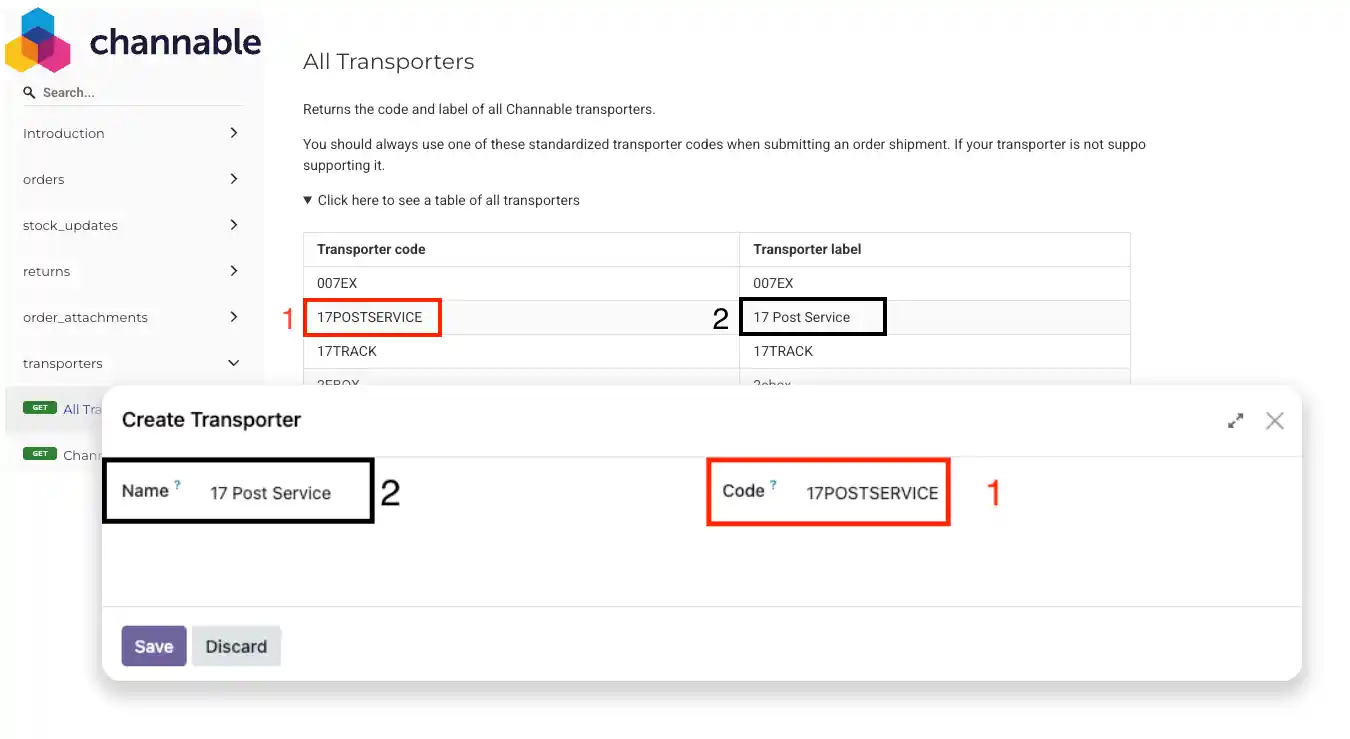
Only one transporter can be configured per code.
Set up a marketplace - field description
In each market, you can configure different parameters according to your company's needs, the following will describe all the fields and the functions they provide:
- Order
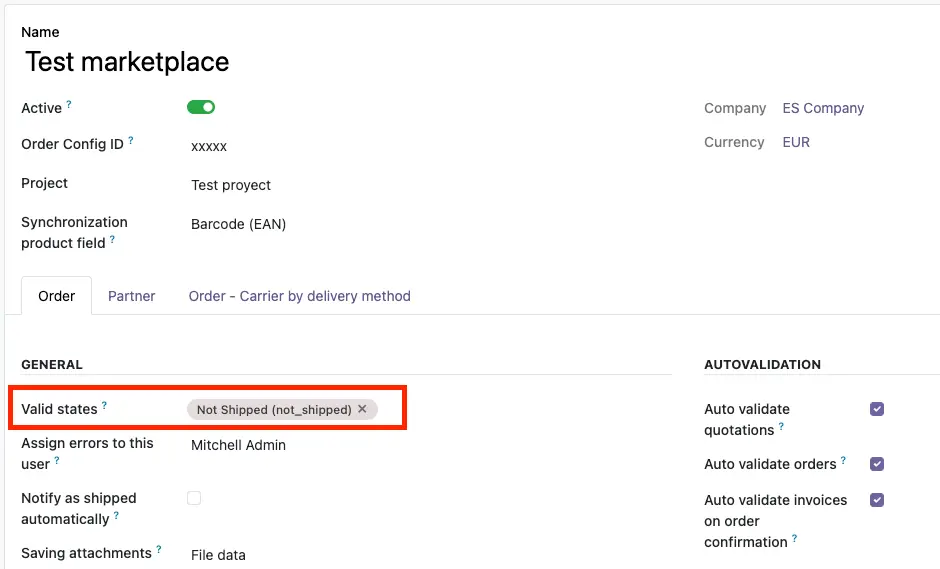
- Active: A conditional that indicates whether the market is active for importing orders or not.
- Synchronization product field: Which product field to use in Odoo when importing orders.
- Valid states: Each order from Channable is assigned a status, you can define here which statuses will be used as a filter when importing orders from Channable.
- Assign errors to this user: User to whom errors will be assigned when trying to synchronize orders from this marketplace with Channable.
- Notify as shipped automatically: When this field is active, orders from this market will be notified as shipped upon confirmation, with the assigned carrier, if there is one, and the tracking reference empty.
- Saving attachments: Channable orders can have attachments, these attachments are saved in the order messages, and you can either save the URL that refers to the document in Channable, or download it to the database, depending on your database structure and limitations, choose one option or the other.
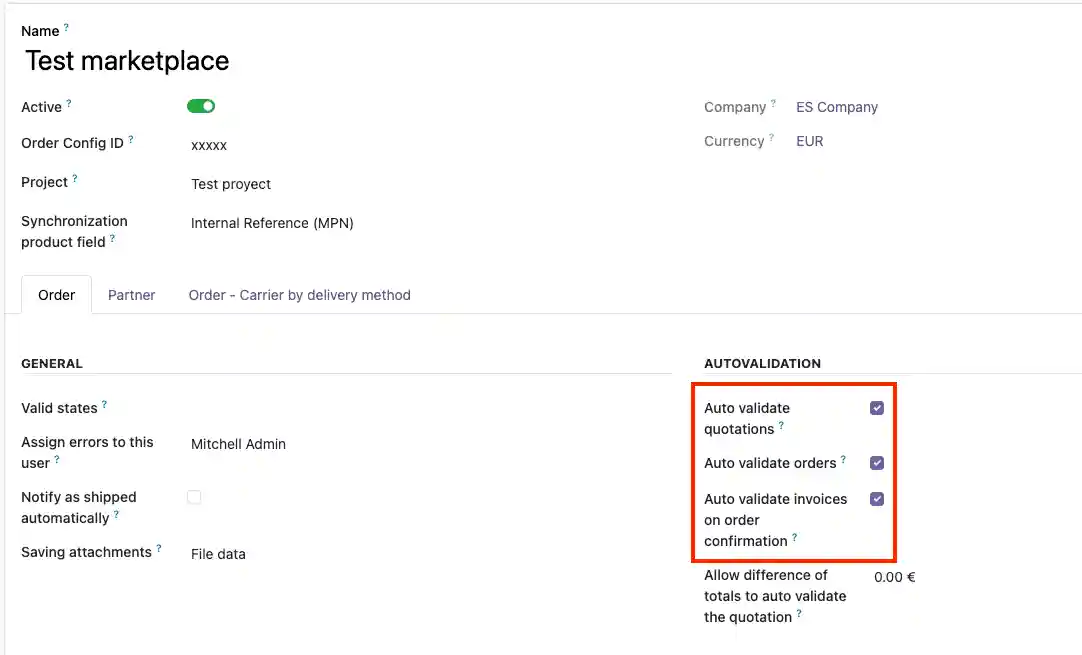
- Auto validate quotations: If this option is enabled, when successfully importing an order from Channable into Odoo, it will be automatically confirmed.
- Auto validate orders: If this option is enabled, when successfully importing an order from Channable into Odoo, the order will be confirmed, and the invoice and delivery notes will be created and validated.
- Auto validate invoices on order confirmation: Automatically validate invoices when confirming the order.
- Allow difference of totals to auto validate the quotation: When importing an order from Channable to Odoo, there may be a difference between the totals that Channable has and those calculated by Odoo with the defined taxes. Here you can set a threshold for the difference between Channable's total and what Odoo has calculated. If it exceeds the value defined here, an error will be triggered, and it will not be automatically confirmed if it was activated.
- Default Fiscal Position: The tax position that will be applied to orders in this market.
- Sales team: The sales team that will be assigned to the orders.
- Pricelist: Price list that will apply to orders.
- Fiscal Position for Intra-Community Orders: Tax position that will be used when detecting an order as intracommunity, for more details click here .
- Payment provider: Provider that will be used to create the payments.
- Payment method (v17.0 and above): Payment method according to the selected provider.
- Warehouse: The warehouse from where the stock for the orders of this market will be picked up.
- Default Carrier: Default shipping method that will be assigned to orders from this market. To make it a valid shipping method, click here .
- Partner
- Language: The language that will be assigned to new clients.
- Tags: Tags that will be assigned to new customers.
- Default partner VAT number: You can set a default NIF/VAT in case the Channable order does not have one defined.
- Order - Carrier by delivery method (in this field, you can define a carrier based on the country of the shipping address of the order).
- Order - Fiscal Position by country (in this field, you can define a tax position according to the country of the billing address of the order).
Marketplace view
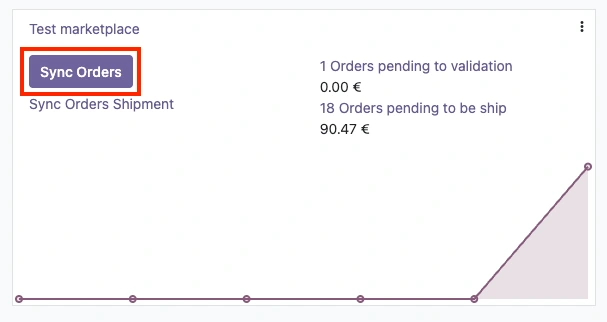
Each market has a view and action buttons. Below, the functionality of each button and market view will be explained in detail. The following image shows the elements that make up a market:
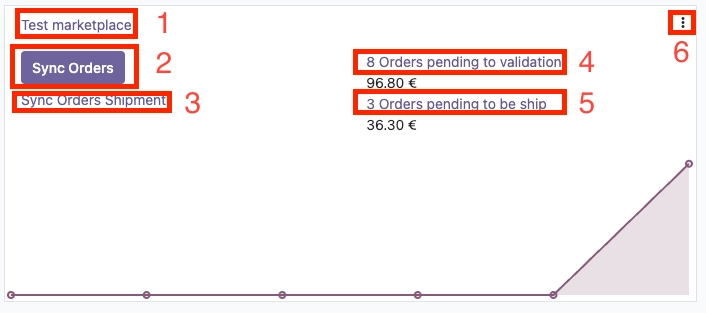
- Button that, when clicked, shows all the market orders.
- Button to manually import orders, for more details click here .
- Manually notify Channable of all orders that have been shipped, for more details click here .
- Button to view pending orders for validation.
- Button to view pending orders for delivery.
- Button to open menu:
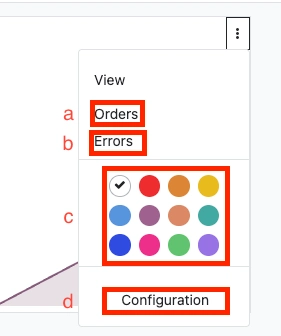
- Button to view all orders.
- Button to view all errors, for more details click here .
- Define color for the kanban view.
- Button to access market settings.
Order view
Each order action button will be explained in detail regarding the functionality of each button and component in the order. The following image shows the elements:
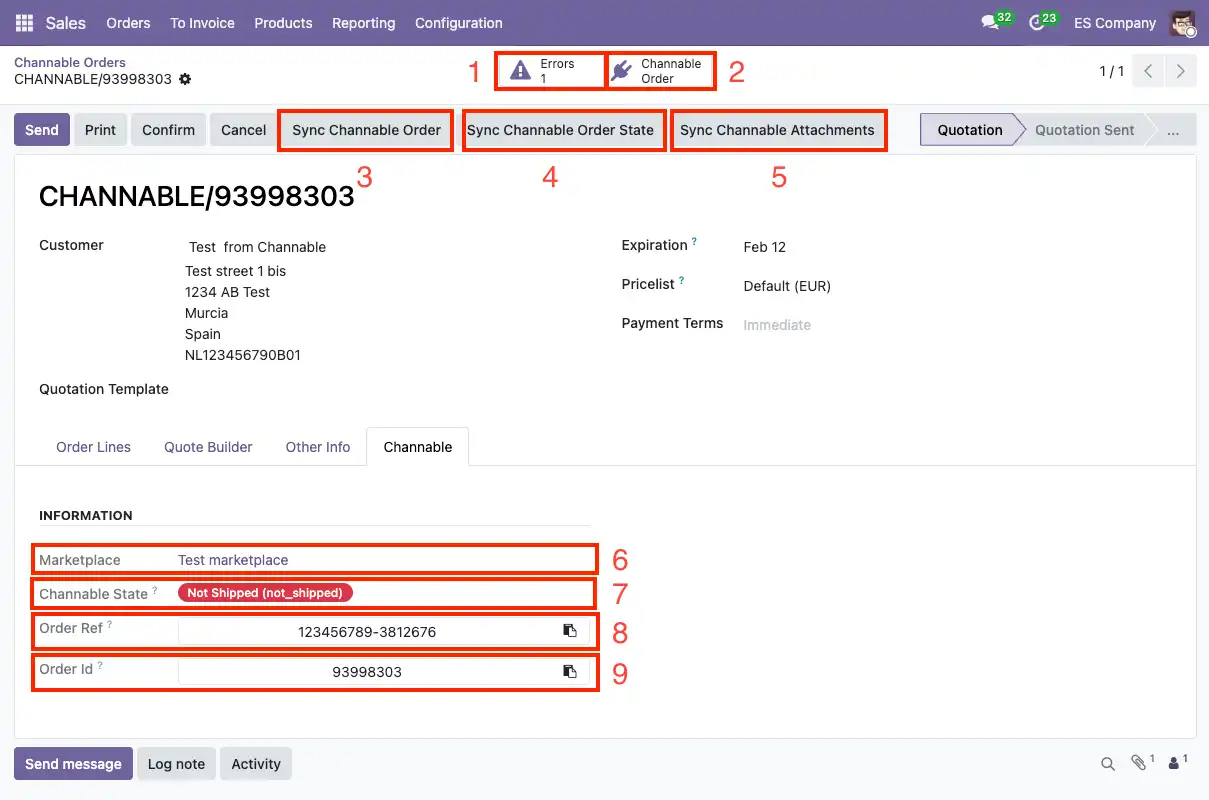
- Button to access the errors generated when synchronizing the order with Channable, for more details click here .
- Direct access to the order on the Channable website.
- Manually synchronize Channable order data, it will update and replace all order data as if it had been imported again.
- Manually synchronize order status, for more details click here .
- Manually synchronize the order attachments.
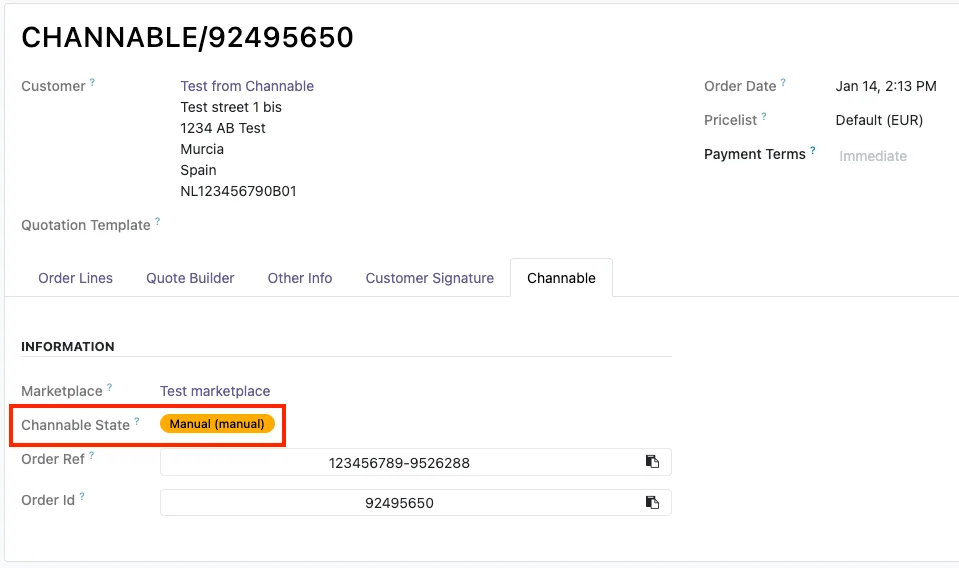
- Market to which this order is assigned.
- Current order status in Channable.
- Market reference in Channable.
- Order identifier in Channable.
To cancel an order in Odoo and notify Channable, you can see more details by clicking here.
Cancel order
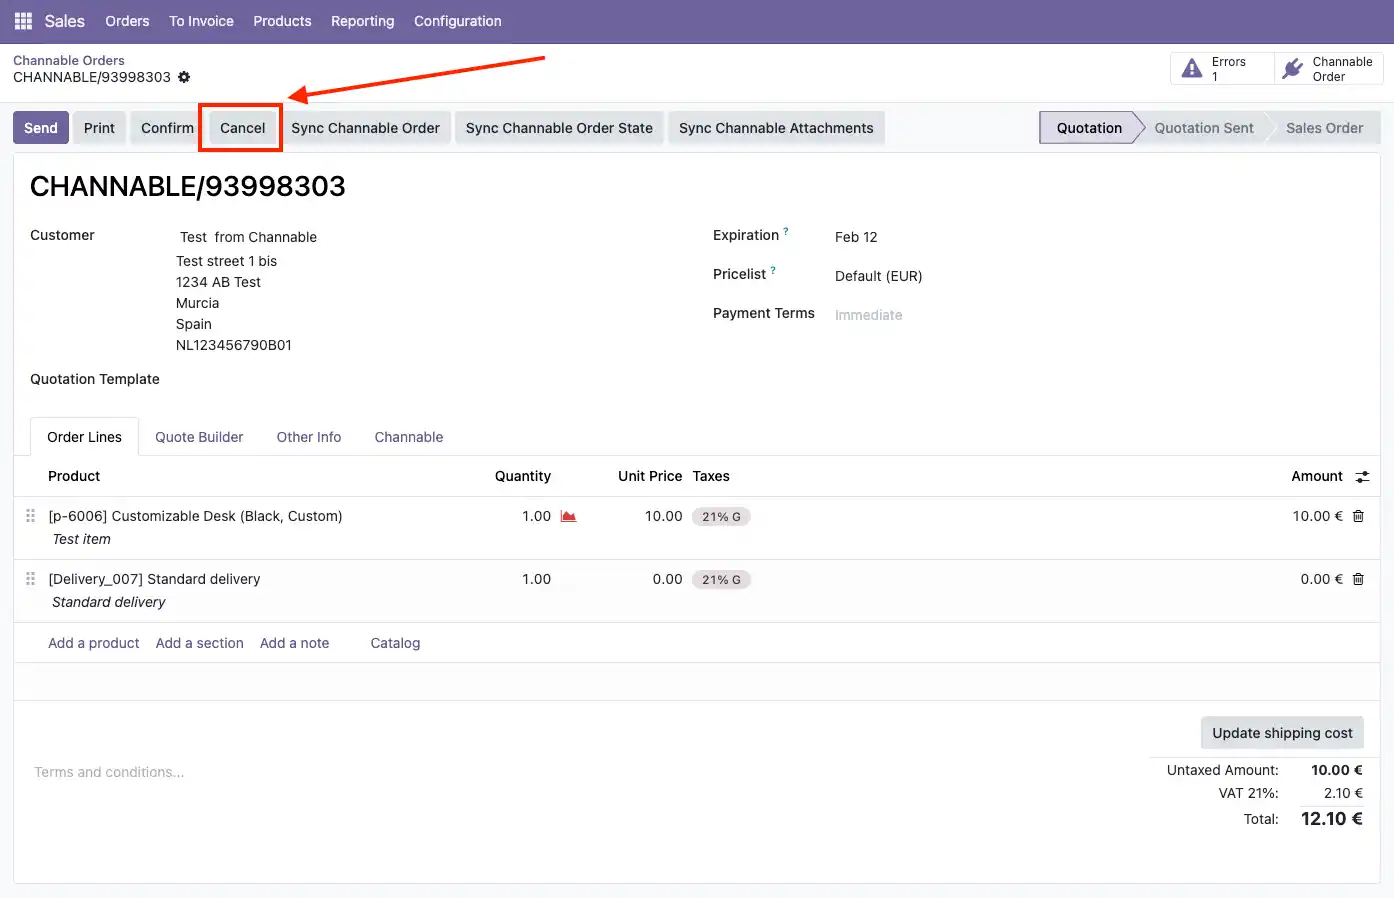
From Odoo, you can notify Channable that an order has been canceled, and Channable will automatically update the status in the connected marketplace. To do this, you need to follow these steps in Odoo:
- First, the order must be in Cancelled status, click on the Cancel button:
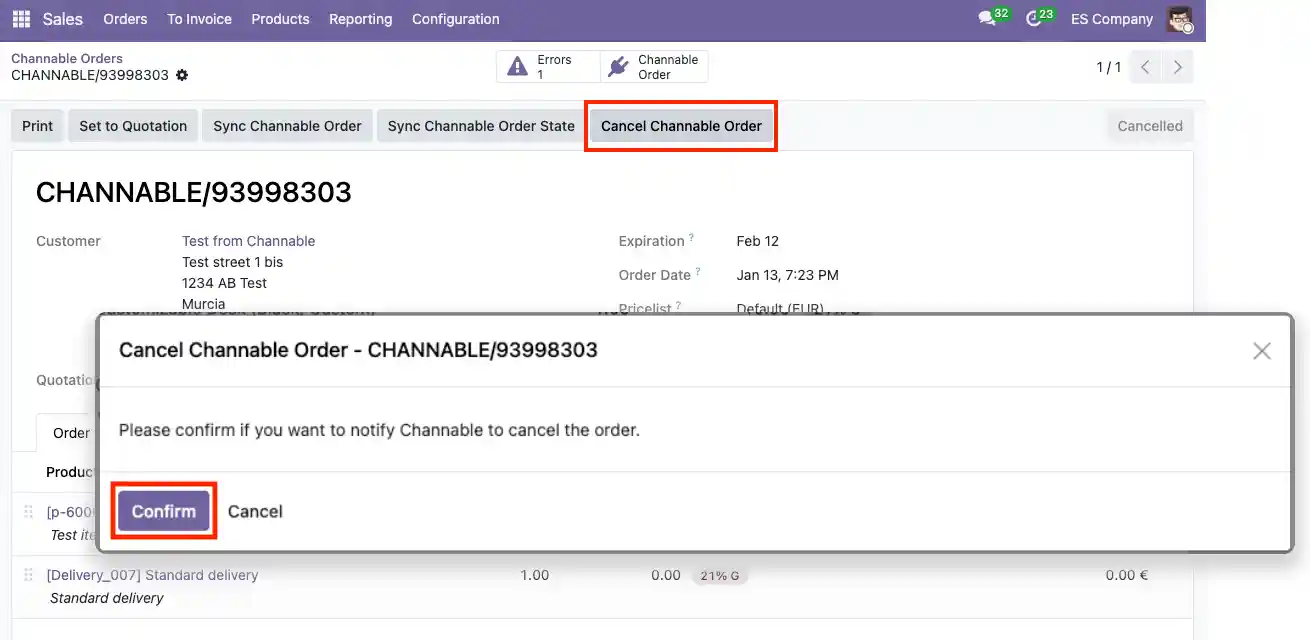
- When the order status is set to Cancelled, the Cancel Channable Order button will appear. Click the button and confirm to notify Channable of the status change:
Channable status of order
In Odoo, the status assigned to the order in Channable is stored and updated, this status indicates whether the order has been shipped, canceled, etc.
The status of an order can be updated in 2 ways, as explained below:
Update order status manually
You can manually update the Channable status of an order by following these steps:
- Go to the Sales module, then to the Orders section ‣ Channable Orders, select the orders you want to update and click on the Sync State button:
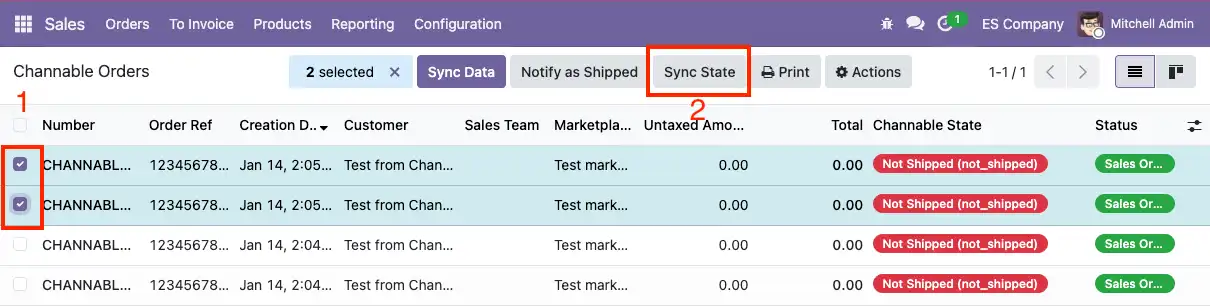
- States will be updated automatically.
Automatically update order status
Every 6 hours, Odoo will automatically update the Channable status of confirmed orders that are 15 days old, and whose Channable status is not Shipped (shipped) or Manual (manual).
Order Error Management
When trying to import or synchronize an order in Odoo and an unexpected error occurs, an error will be generated with all the details that will be linked to the order, and a task will be assigned to the user who has previously been set up in the marketplace. The functionality and how to access the errors of an order will be detailed below:
Access an error through an activity
The errors generated when importing an order will be assigned to the user configured in the marketplace. To access the activities, follow these steps:
- Go to your activities:
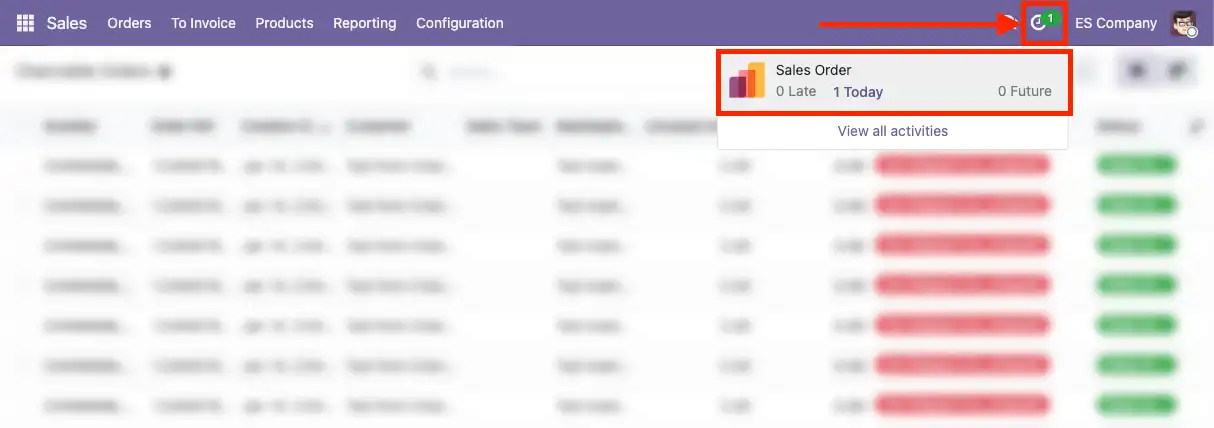
- The generated activities look like this:

- By clicking on the link, you will be redirected to the error details, to see more details, click here .
Access all errors of an order
The errors generated when importing an order will be linked to the order. To access all the errors of a Channable order, follow these steps:
- Go to a Channable order, and if there are assigned errors, a button called Errors will appear at the top:
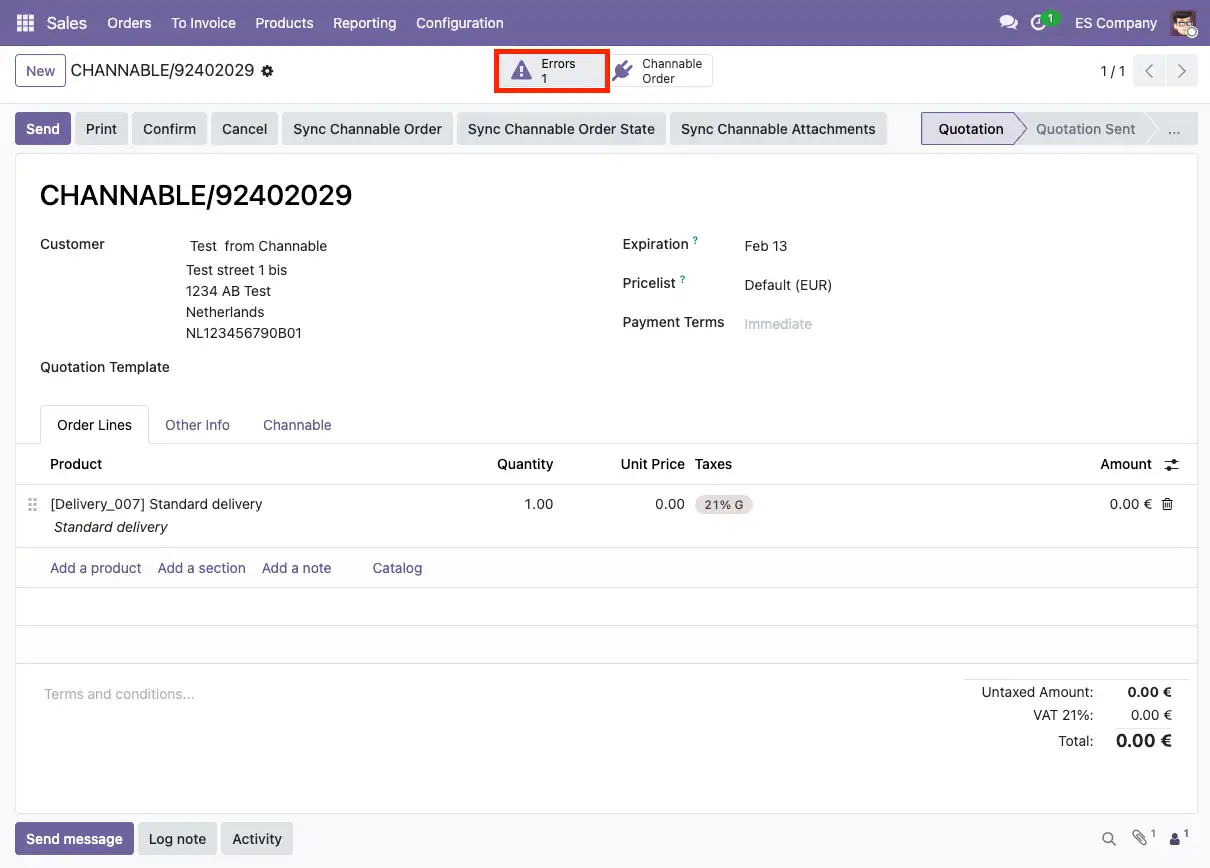
- By clicking the button, all the errors assigned to this order will be listed, you can filter by date, error description, etc.
- To see more details about an error, click on one, to see more details click here .
Access all the errors of a market
You can see all the errors generated from the orders of a market, to do this follow these steps:
- Go to the Sales module, then to the Settings section ‣ Channable Connector - Marketplaces.
- In the marketplace, open the menu and access Errors:
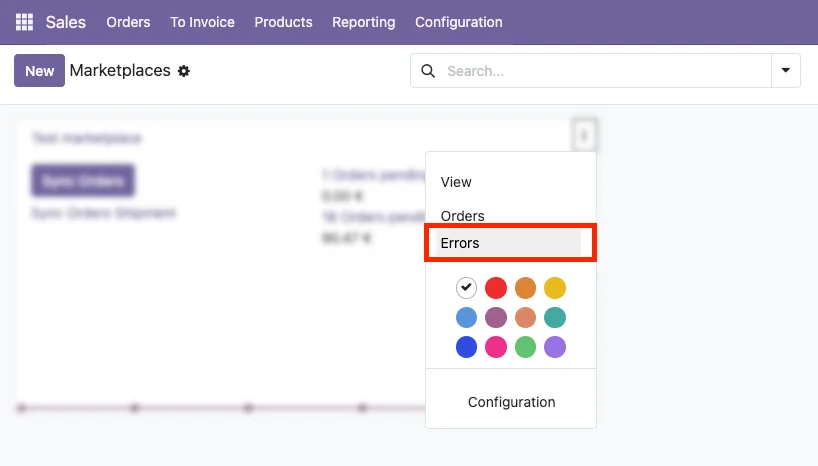
- By clicking the button, all the errors assigned to the orders in this market will be listed, you can filter by order, creation date, error description, etc.
- To see more details about an error, click on one, to see more details click here .
Error details
When accessing an order error, the following fields will be displayed:
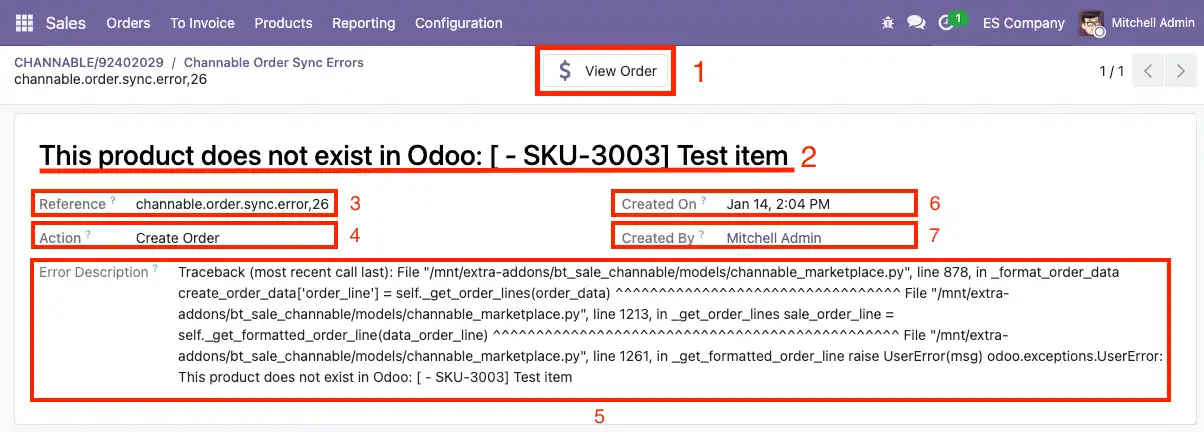
- Button to access the order in Odoo.
- Brief description of the error.
- Unique reference generated when creating the error.
- Action that was attempted and generated the error, the possible values are as follows:
- Create Order: When creating the order.
- Sync Order: When synchronizing the order.
- Update Shipment Info: When notifying that the order has been shipped.
- Sync Order State: When trying to update the order status.
- Sync Order Tracking Code: When trying to send the tracking reference.
- Confirm Order: When trying to confirm the order.
- Detailed description of the error, it can only be seen by enabling developer mode.
- Moment when the error occurred.
- Who attempted to take action on the order.
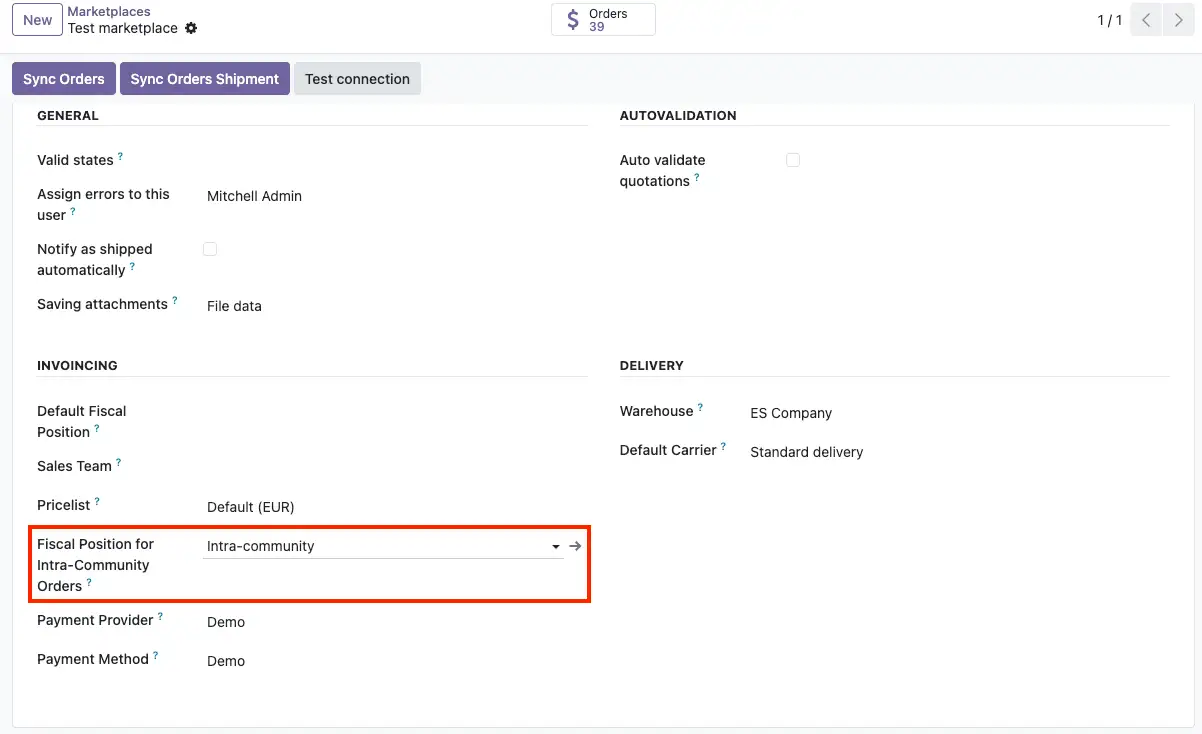
Set up fiscal positon for intra-community orders
When importing an order from Channable, Odoo can detect if it is an intracommunity order and assign a specific fiscal position. The following will describe how to configure it:
- Go to the Sales module, then to the Configuration section ‣ Channable Connector - Marketplaces, access the market configuration and define a fiscal position in the Fiscal Position for Intra-Community Orders field, this will be the tax position assigned to the intra-community orders for this market:
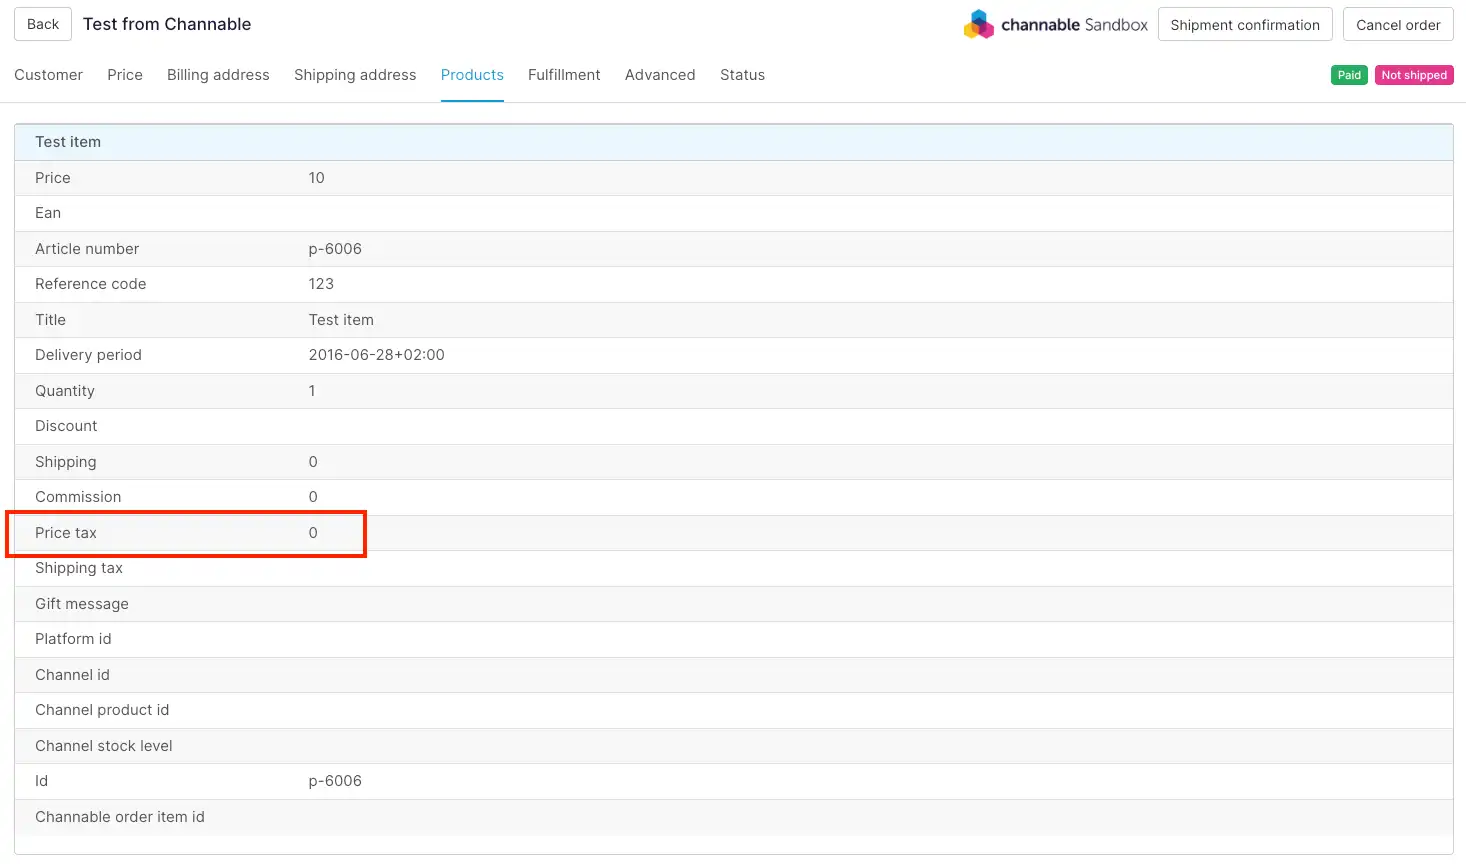
- To define this fiscal position when importing an order, Channable the order must meet 2 conditions:
- The Business order field must have the value: true.
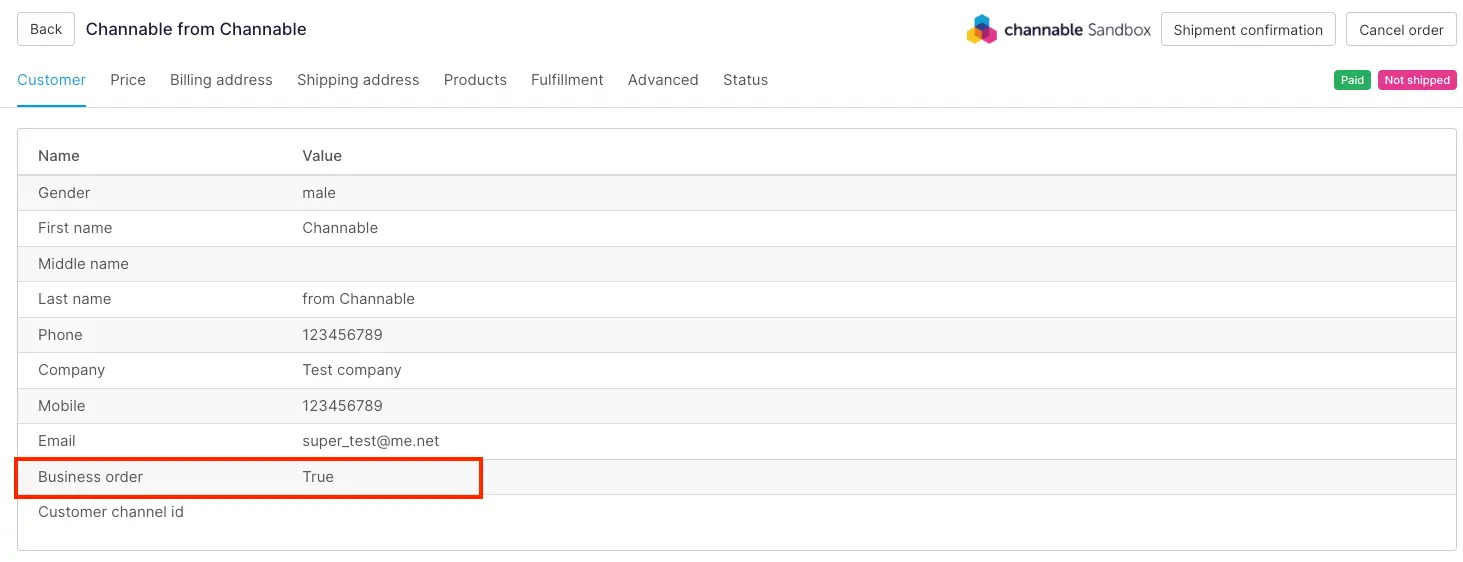
- The total amount of taxes for the order lines must add up to 0.
- The Business order field must have the value: true.
Import orders manually
You can manually import new orders from a marketplace, to do this follow the steps below:
- Go to the Sales module, then to the Settings section ‣ Channable Connector - Marketplaces, in the marketplace click on the Sync Orders button:
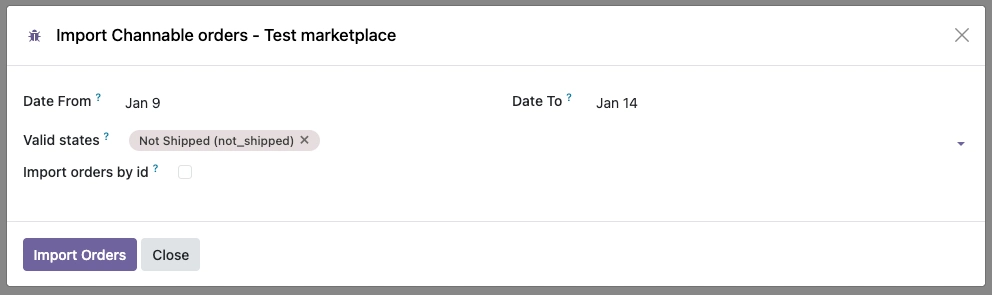
- A pop-up will open, where you can filter by start date and end date of order creation and filter by valid order states:
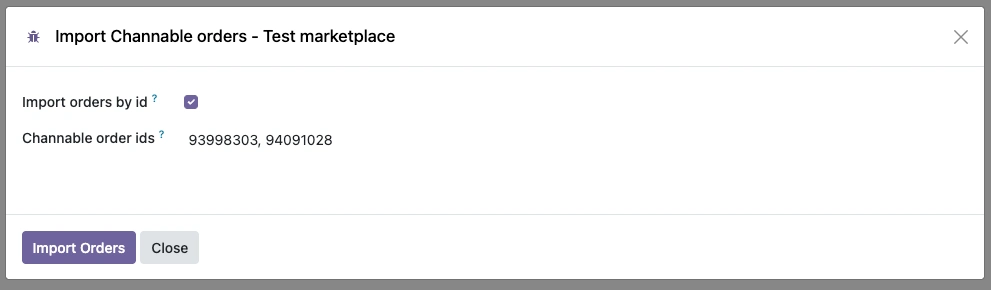
- You can filter by the Channable identifier of the orders by enabling the option Import orders by id, a text field will be displayed where you can enter the identifiers separated by commas:
- Finally, you click on the Import Orders button, and the orders from the selected market are imported according to the filters that have been defined.
Ship orders manually
You can manually notify Channable if an order has been shipped and update its status in the marketplace, there are 2 options to perform this action:
Ship market orders
You can mark all pending orders from a market as shipped, to do this, follow these steps:
- Go to the Sales module, then to the Settings section ‣ Channable Connector - Marketplaces, in the marketplace click on the Sync Orders Shipment button:
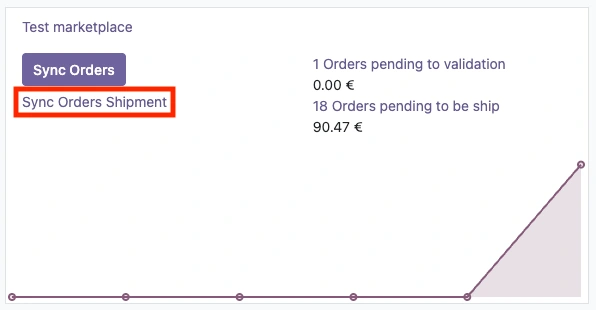
- All pending orders to be shipped will be retrieved, and the status will be updated in Channable. To see what the conditions are for an order to be pending shipment, click here .
Ship order manually
You can notify one or more orders as shipped, to do this, follow these steps:
- Go to the Sales module, then to the Orders section ‣ Channable Orders, in the list of Channable orders, select the orders you want to update:
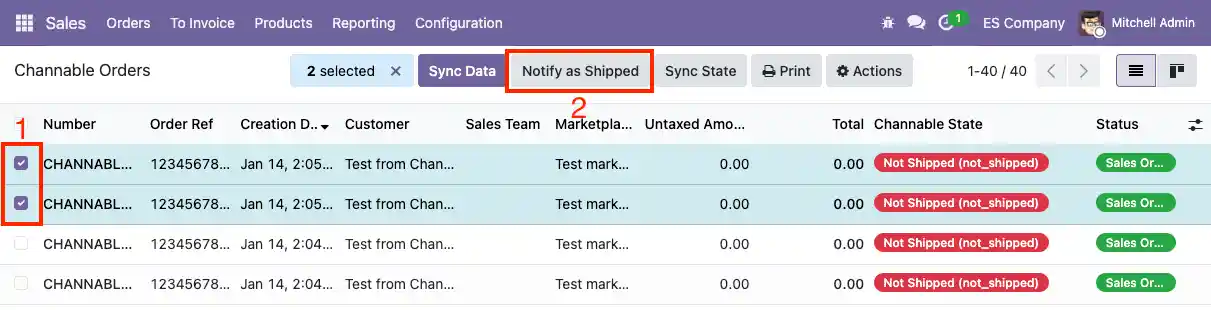
- Once the orders are selected, click the Notify as Shipped button.
- To see what the conditions are for an order to be pending shipment, click here .
Ship order automatically
Every hour, Odoo will automatically notify as shipped those orders whose shipping date is less than 5 days, whose Channable status is not Shipped (shipped), and that contain a delivery note with the Channable synchronization status set to Pending.
Pending order to be shipped
For a Channable order to be pending notification as shipped in Odoo, it must meet the following points:
- The order status cannot be either canceled or in draft.
- The status of Channable in the order cannot be Manual (manual).
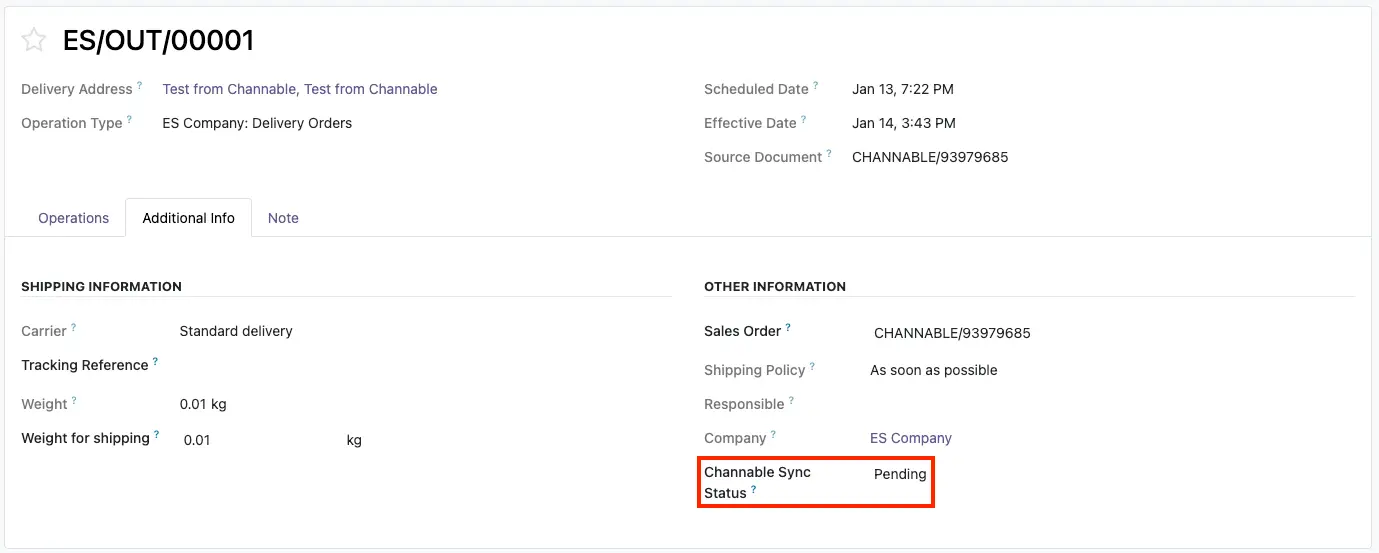
- Must have delivery notes prepared.
- The Channable Sync Status field in the delivery note must have the value Pending.
Permissions in the connector
You can assign certain permissions to Odoo users so that they can or cannot create new markets, or perform actions on orders or not, you can assign this by following these steps:
- Go to the Settings module, then to the Users and Companies section ‣ Users, access a user's profile and modify the following group:

- You can assign 3 types of permissions to a user:
- User: Allow to view orders: These users can only view data, they cannot create, import, or cancel orders from Channable.
- User: Allow to manage orders: These users can import orders, mark them as shipped, but cannot create new markets, projects, and connections in Odoo.
- Administrator: These users can create new markets, connections, import orders, etc.
You can remove the user's full access to the connector by leaving the field empty.
Frequently Asked Questions
In order for delivery notes and invoices to be validated automatically when importing an order from Channable into Odoo, the following fields must be activated in the marketplace configuration:
For a marketplace to import intracommunity orders in Odoo, follow the following instructions here.
In order for Odoo to notify Channable that an order has been shipped, it must meet certain conditions, which I will explain to you here.
Odoo automatically imports orders from all markets every 2 hours, according to the valid states that have been defined in the marketplace:
Odoo automatically notifies Channable that an order has been shipped, to see more details click here.
A Channable order must be unique, if the market reference already exists in an order and is not canceled, the order will not be created, the data will be imported and overwritten in Odoo.
In order for an order to be ready for shipment and to notify Channable with the tracking reference, the order must contain a validated delivery (OUT). Once the status of the packing slip is validated, the Channable Sync State will automatically update to Pending.
The delivery note must have a defined and valid carrier. If the carrier with which the delivery note was validated is not a valid carrier for Channable, it will be notified as sent without a carrier. To define a valid carrier, click here.
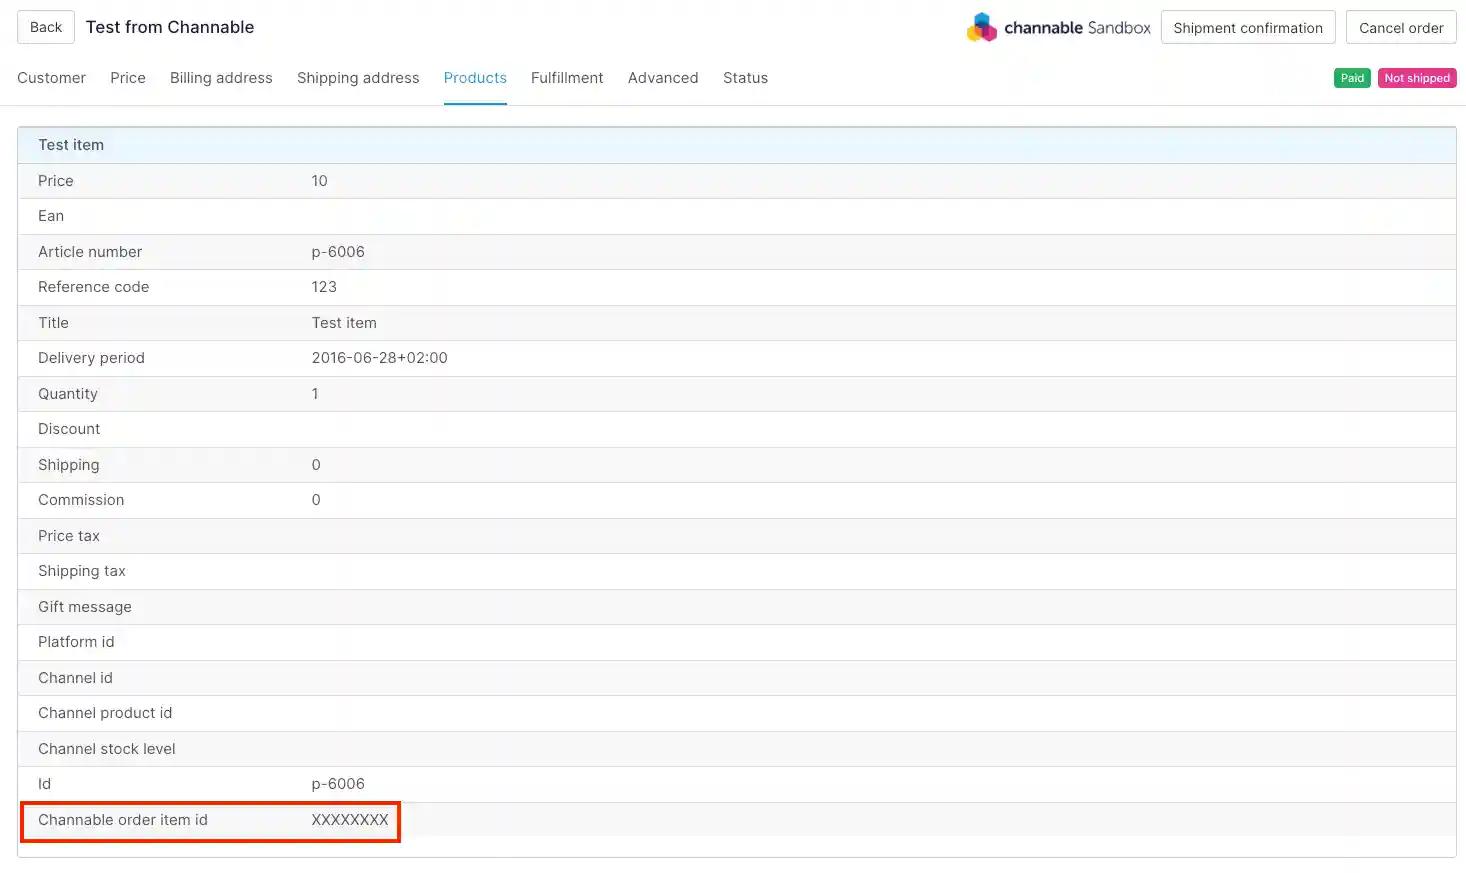
The connector allows shipping orders partially to Channable. To do this, the line identifier in Channable is obtained. If Channable has defined the Channable order item id for the line, it can be sent partially, otherwise, it cannot:
If you see the following error message when trying to confirm an order from Channable, "The order partner is the default one for Channable orders. Please set a valid partner before confirming the order." It means that the customer associated with the order in Channable has not been imported correctly, therefore it could not be created, and a temporary customer has been assigned. This record is necessary to create orders even if the customer's record fails during import.
The connector has access groups; depending on the group to which the user belongs, the functionalities of the connector will be displayed or not. For more details, click here.
To import orders in Odoo and obtain products according to their EAN (Barcode), follow these points:
- Go to the Sales module, then to the Settings section ‣ Channable Connector - Marketplace, access the marketplace configuration, and change the Synchronization product field to the value Barcode (EAN):
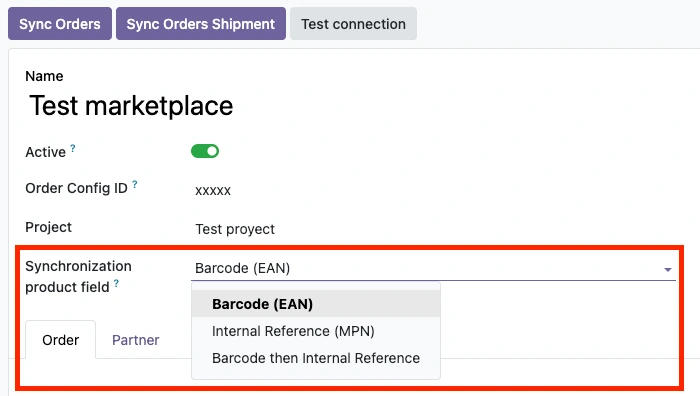
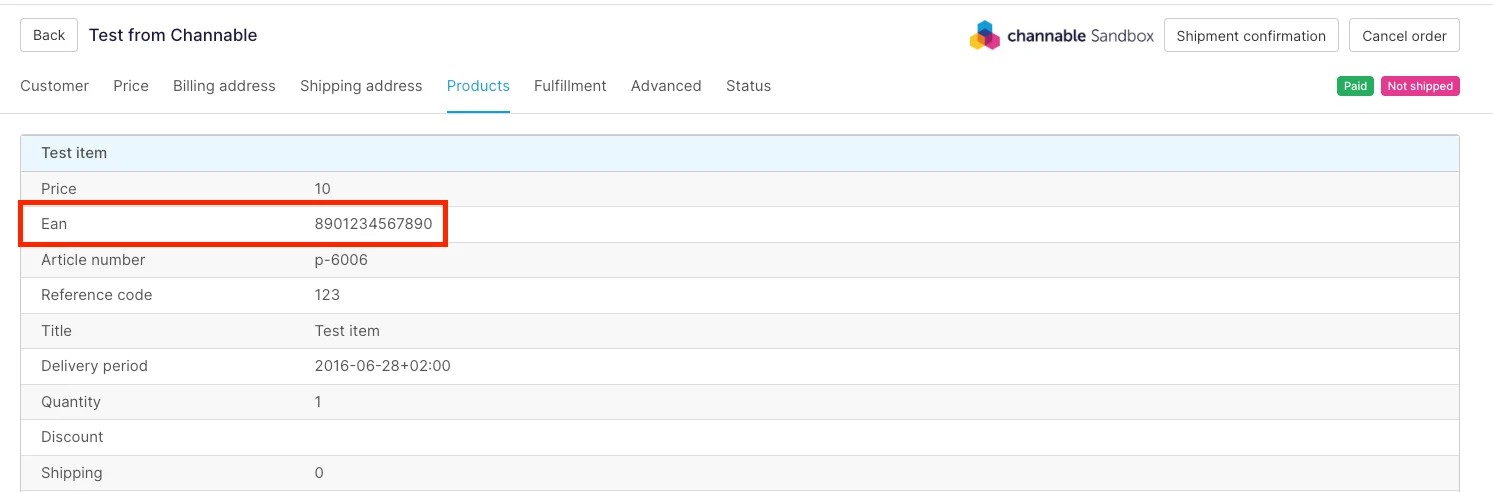
- Now when importing orders, the products will be searched by the field Ean:
To import orders in Odoo and obtain products according to their reference (MPN), follow these points:
- Go to the Sales module, then to the Settings section ‣ Channable Connector - Marketplace, access the marketplace configuration, and change the Synchronization product field to the value Internal Reference (MPN):
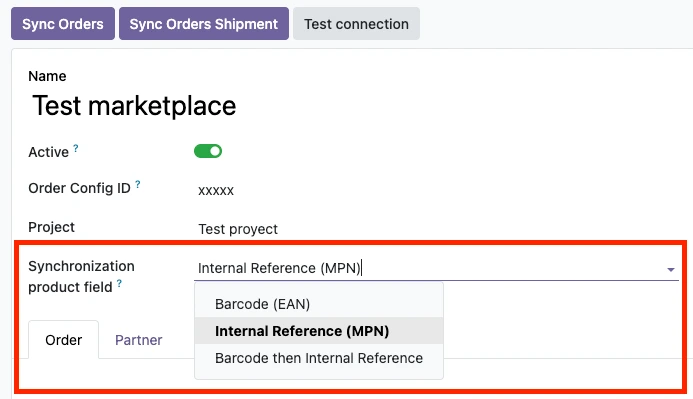
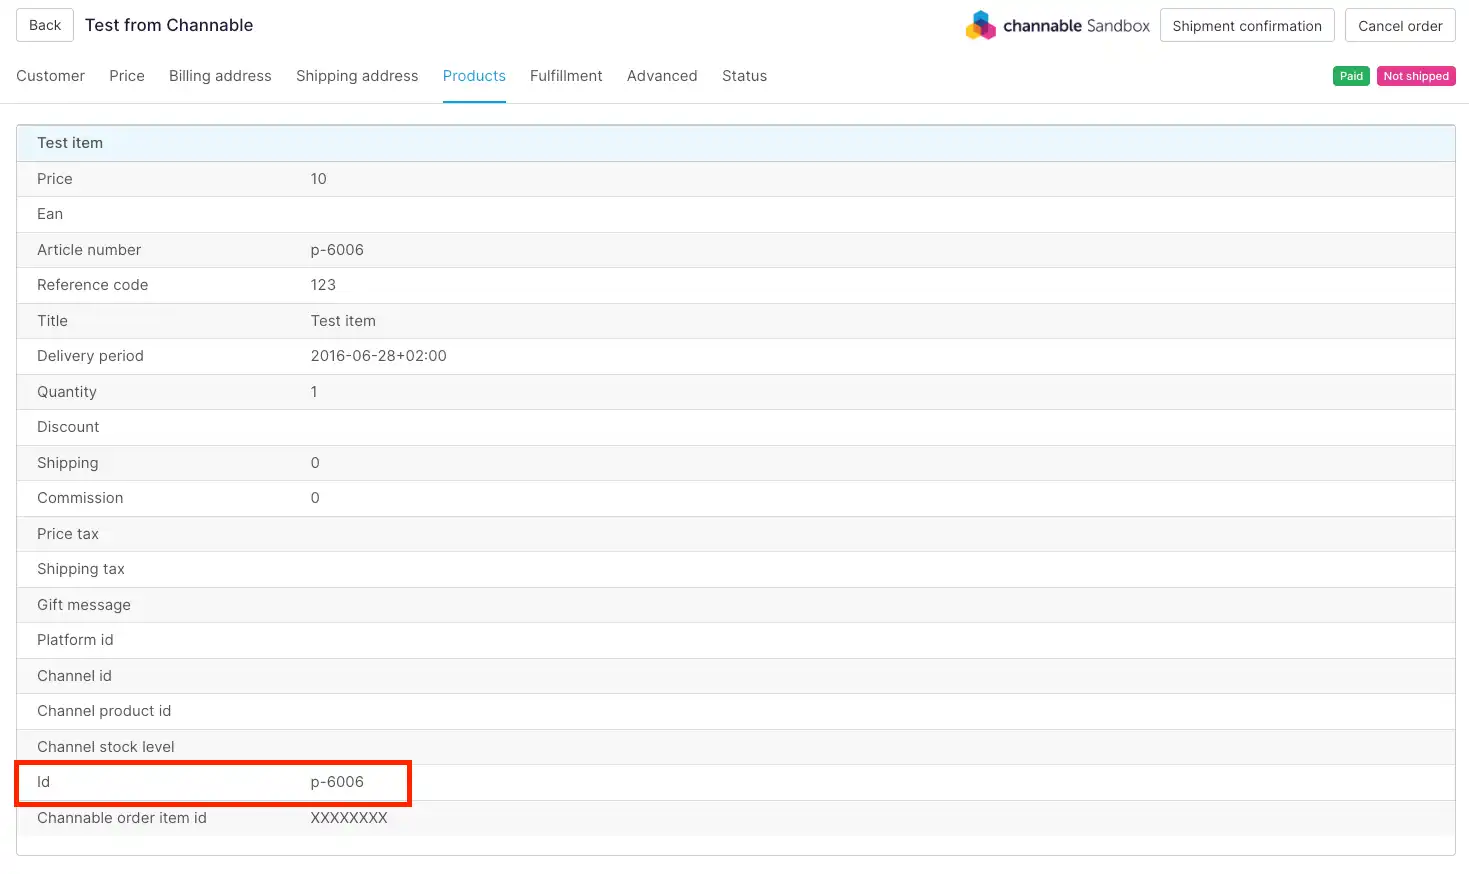
- Now when importing orders, the products will be searched by the field Id:
Yes, when importing an order from Channable and an error occurs, Odoo will notify you, you can see more details here.
To modify the user to whom errors are assigned, follow these points:
- Go to the Sales module, then to the Settings section ‣ Channable Connector - Marketplaces, access the market configuration, and modify the field Assign errors to this user:
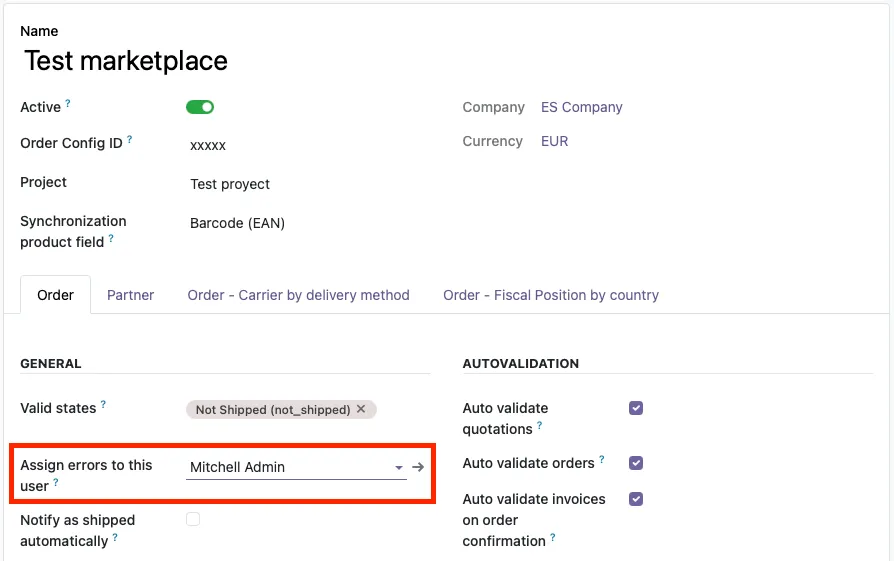
- When assigning the user, you will be notified of all errors that occur while synchronizing the Channable order.
Yes, when you import an order, the payment is automatically created with the total and order reference in Channable, ready to be linked to the invoice:
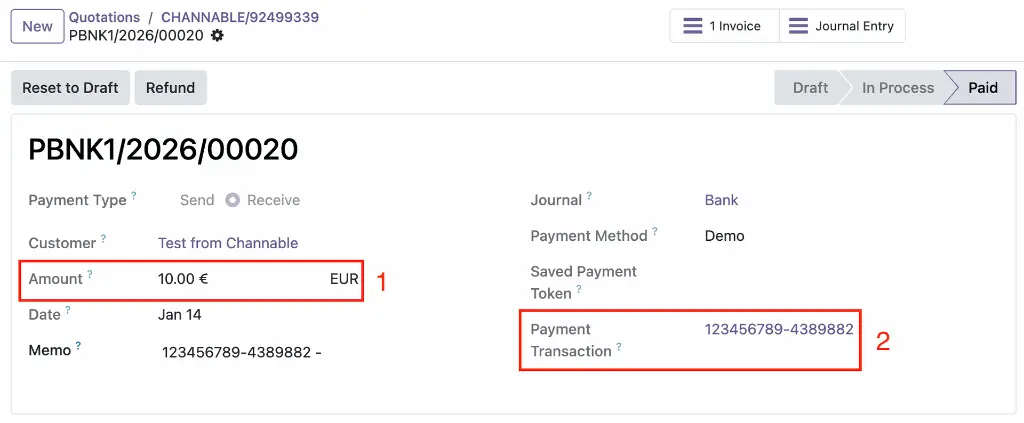
- Total order amount in Channable.
- Market order reference.